In the dynamic realm of Web3 technologies, RockX is spearheading a revolution with its innovative Native ETH Staking API integration, designed to democratize ETH staking for a broader audience while empowering institutions to tailor the staking experience to their unique needs. This pioneering approach not only simplifies the integration process for institutional clients like Amber Group and Cactus Custody but also opens up avenues for them to customize and enhance their offerings, bringing the benefits of ETH staking to more customers with unparalleled ease and security. Through this guide, we will navigate the intricacies of incorporating RockX’s Native ETH Staking Solutions into your Web3 product, ensuring a seamless, secure, and personalized staking journey for your end-users.
Get Started With API Integration
Step 1: Register a RockX account via https://sso.rockx.com for Mainnet; or https://beta-sso.rockx.com for Testnet environment
Step 2: Create an API token (RockX will assign a test token for Testnet environment)
Step 3: Prepare an ETH wallet with at least 32.5 ETH to support at least one validator and gas fees
Step 4: Prepare 1 – 2 ETH wallets to receive fee recipient/ MEV rewards and staking rewards
Environment Information
Different API token applies per ENV
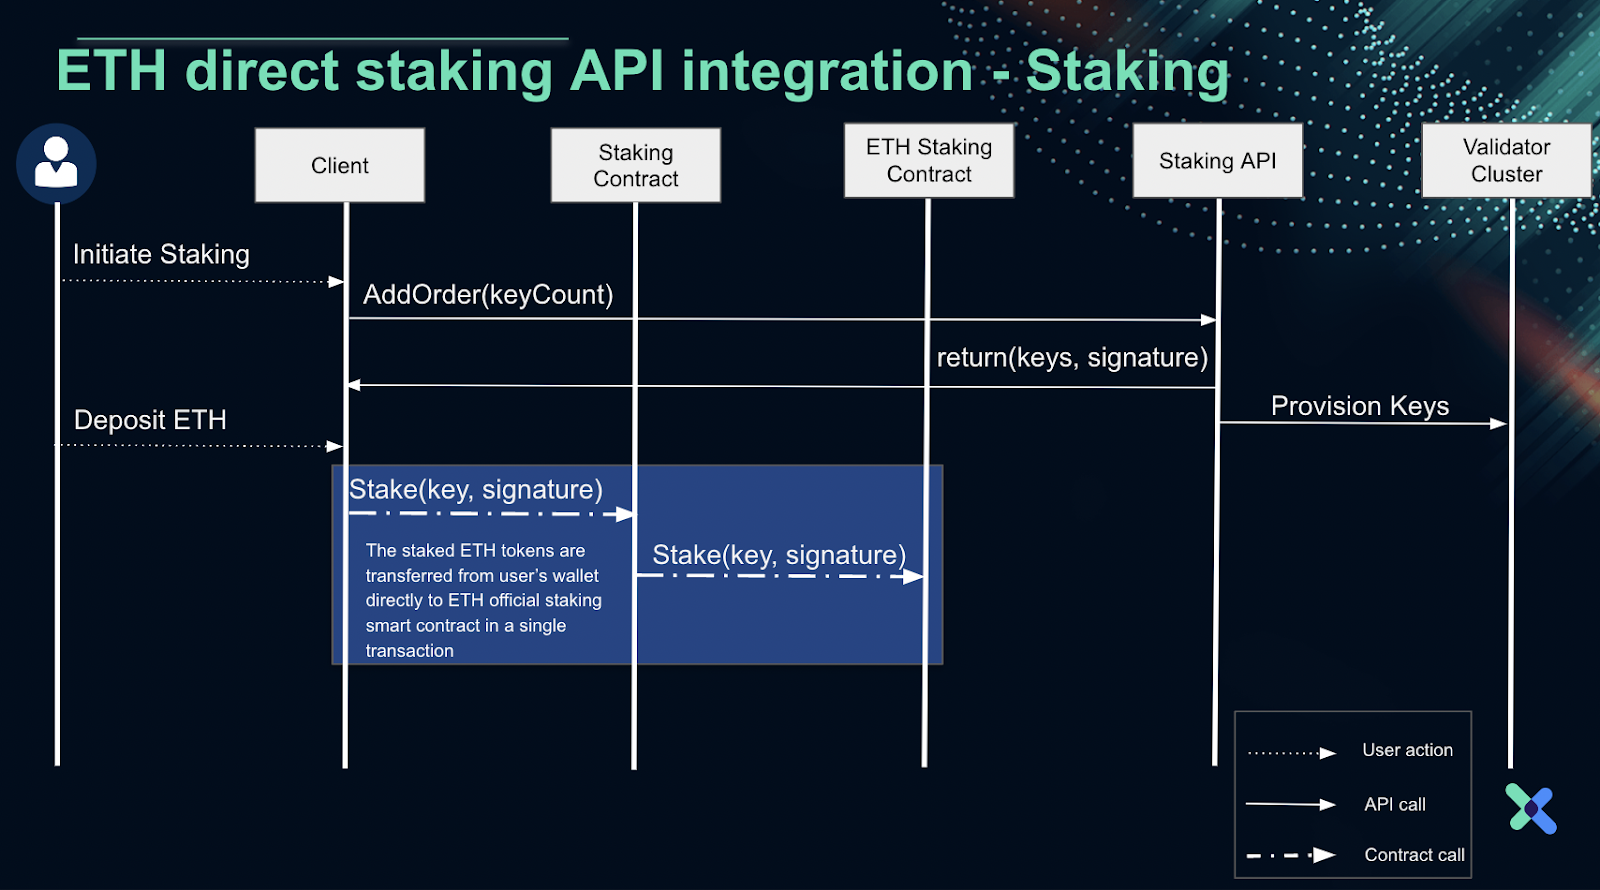
ETH Native Staking Flow

User Guide To Stake via API
Prepare an API call payload
First, prepare an API call payload in multiples of 32 ETH as each validator key will require 32 ETH to stake. In this example, we will assume a single validator key (count = 1), hence, you are required to prepare a 32 ETH call payload.
Step 1: Prepare the API payload
curl -X POST -d '{
  "claim": "$TX_FEE_REWARDS_RECIPIENT_ADDRESS",
  "count": 1,
  "withdraw": "$WITHDRAWAL_ADDRESS"
}' -H "Authorization:Bearer $TOKEN"
https://stake-api.rockx.com/api/v1/eth2/order/add
Step 2: Replace the variables accordingly and make the HTTPS API call
| Field name | Type | Mandatory? | Description | Notes | |
| TOKEN | string | Yes | The access token of API user | ||
| data | claim | string | Yes | The claimAddress used to claim transaction fee rewards and MEV rewards, user must ensure the ownership of this address | User must ensure the ownership of this address |
| count | int | Yes | The number of validator keys user intends to stake | Range: 1-100 | |
| withdraw | string | Yes | The withdrawal address that exit the ETH validator | User must ensure the ownership of this address | |
Step 3: Upon successful API call, a standard JSON format response will be returned with the following data structure:
| Field name | Type | Description | Notes | |
| code | string | HTTP status code | ||
message | string | Message returned from server | ||
| data | pubkeys | array | List of pubkeys created for staking | Must keep the sequence as it is |
| signatures | array | List of signatures used for each pubkey | Must keep the sequence as it is | |
| paramsSig | string | The verification signature | ||
| extradata | int | Reserved data | ||
Step 4: Take the return values and prepare the contract call. To illustrate it in a natural way, the demonstration is made via etherscan contract call as below:
Stake and Connect Process
Once the API call payload and necessary setup are established, you may commence the staking and wallet connecting process.
Step 1: Go to Stake Contract
Via Mainnet: https://etherscan.io/address/0xe8239B17034c372CDF8A5F8d3cCb7Cf1795c4572#writeProxyContract
Via Testnet:
https://goerli.etherscan.io/address/0x2176FF25DBcd2FA1E61184cdb1Be2644EA90862A#writeProxyContract
Connect your Metamask wallet by filling up the parameters accordingly in function “13.stake” for Mainnet; “11.stake” for Testnet
| Parameter | Description | Example value |
| stake | The amount of ETH user to stake, it must be identical with the count in the API call in step #1, else the contract call will fail | 32, 64… the 32 times the count in the API call in step #1 |
| claimaddr | The address to claim tx recipient / MEV rewards, can be the same as deposit addresss | 0x333e6Ea9d938eC7a4ED0Cb7cc553f3c3fd386c93 |
| withdrawaddr | The withdrawal address and staking rewards address, can be the same as deposit addresss | 0x333e6Ea9d938eC7a4ED0Cb7cc553f3c3fd386c93 |
| pubkeys | The list of pubkeys obtained from the API call in step #1 | [0xb5f9e9368e937a9fc9ea640c337ccc5e549724bc7fcf1c319d94f37626c9a505e73e2b45ccfd2070940f476cc88001d6] |
| signatures | The list of signatures obtained from the API call in step #1 | [0x9168a2f3d14ee8b5d2967bcc51b14ff4a6f3783de29cc3d396233a30d7ad707c00e633413ac7c10c8a1d993efdcdcfd70420ef63259cd0b9b840c43bc3be3858a85824250802efff217e90cad506bc8e1c63bf9ca1d016fe99e52dc7a386a69e] |
| paramsSig | The params signature returned from the API call in step #1, must be the same as what is returned | 0xf33d630533af372fb5d1b388256caa86878aeacacac594cd90b262846679655c6c06e640e2c06abc5a2a4c7883bbc4bc87d38c808e0208ceee08dbe3a8d1430b1c |
| extradata | The extradata returned from the API call in step #1, must be the same as what is returned | 11828 |
| tip | The reserved data field | 0 |
Upon successful contract call, staking is completed. It will usually take 1-2 days or more for the validator to be active, depending on the queue of pending validators in ETH network.
Step 2: Check the status via https://beaconcha.in/validator/${pubkey} for Mainnet; https://goerli.beaconcha.in/validator/${pubkey} for Testnet. The pubkey is returned from the previous API call
- Check claimable rewards via Reward Pool Contract
Mainnet:
https://etherscan.io/address/0xb7019c9184580b2E1f66fCDc3EB6c62621732064#readProxyContract
Testnet:
https://goerli.etherscan.io/address/0xaD13252977ec93F8Ce36c918F5882B81c427A23B#readProxyContract
- Fill up the parameters accordingly in function “7.getPendingReward”
| Parameter | Description | Example value |
| claimaddr (address) | The claim address provided in the API call #1 | 0x333e6Ea9d938eC7a4ED0Cb7cc553f3c3fd386c93 |
- Claim rewards via Reward Pool Contract
Mainnet:
https://etherscan.io/address/0xb7019c9184580b2E1f66fCDc3EB6c62621732064#writeProxyContract
Testnet:
https://goerli.etherscan.io/address/0xaD13252977ec93F8Ce36c918F5882B81c427A23B#writeProxyContract
- Fill up the parameters accordingly in function “1.claimRewards”
| Parameter | Description | Example value |
| beneficiary (address) | Any address that you have access to receive the rewards | 0x333e6Ea9d938eC7a4ED0Cb7cc553f3c3fd386c93 |
| amount | The amount of ETH rewards to claim | 100000000000000000 |
- Query validator info in Stake Contract
Mainnet:
https://etherscan.io/address/0xe8239B17034c372CDF8A5F8d3cCb7Cf1795c4572#readProxyContract
Testnet:
https://goerli.etherscan.io/address/0x2176FF25DBcd2FA1E61184cdb1Be2644EA90862A#readProxyContract
- Fill up the parameters accordingly in function “11.getValidatorInfos”
- Map the pubkeys returned to determine the validatorId
| Parameter | Description | Example value |
| from | The starting Id for query | 1 |
| to | The ending Id for query | 5 |
Validator Status tracking
Validators status such as staking rewards, tx fee rewards, validator status etc can be tracked. There are 2 ways to get the latest data of validator status:
- Staking Dashboard
- Query via API
- Prepare the API payload
curl -X POST -d '{
    "searchKey":$SEARCHKEY,
    "keywords":$KEYWORDS,
    "status":[$STATUS]
}' -H "Authorization:Bearer $TOKEN"
https://stake-api.rockx.com/api/v1/eth2/validator/list
- Replace the variables accordingly and make the HTTPS API call
| Field name | Type | Mandatory? | Description | Notes | |
| TOKEN | string | Yes | The access token of API user | ||
| data | limit | int | No | The amount of results per query | Used for pagination |
| offset | int | No | The offset of the current query if limit is indicated | Used for pagination | |
| status | array | No | The status to filter the transactions returned | Enum:pending,active,exit,slashed | |
| searchKey | string | No | The search type for the keywords | Enum:”pubKey”, “withdrawAddress”, “claimAddress”, “validatorId” | |
| keywords | string | No | The info to search based on the searchKey given | For example, search based on claimAddress, by passing in: {“searchKey”:”claimAddress”, “keywords”:”0x333e6Ea9d938eC7a4ED0Cb7cc553f3c3fd386c93”,} | |
- Upon successful API call, a standard JSON format response will be returned with the following data structure:
| Field name | Type | Description | Notes | |
| code | string | HTTP status code | ||
message | string | Message returned from server | ||
| data | total | int | The amount of validators returned in current query | |
| limit | int | The amount of results per query | ||
| offset | int | The offset of the current query if limit is indicated | ||
| Data[] | pubkeys | string | List of pubkeys created for staking | Must keep the sequence as it is |
| withdrawAddress | string | The withdrawal address to receive the staking rewards and | 0x333e6Ea9d938eC7a4ED0Cb7cc553f3c3fd386c93 | |
| claimAddress | string | The address to claim tx recipient / MEV rewards | 0x333e6Ea9d938eC7a4ED0Cb7cc553f3c3fd386c93 | |
| validatorIndex | int | The index of validator on-chain | ||
| validatorId | int | The index id of validators tracked in staking contract | ||
| balance | string | The eth balance of the validator | ||
| protocolRewards | string | The staking rewards | ||
| activation | int | The timestamp when validator was activated | ||
| status | string | The validator status | Enum:pending,active,exit,slashed | |
Unstaking
Unstaking Flow Chart

Steps to unstake
There are 2 functions to exit the validator(s). To exit, the user will need to check the validatorId per pubkey accordingly.
- (Optional) Check the validatorId of the pubkey
There are 2 options to get the validatorId of the pubkey mentioned in above document:
- Call staking contract function “11.getValidatorInfos”
- Query validator list API (Recommended)
- Withdrawal of a single validator
- To initiate the exit messages, the user must input claimaddr with the exact validatorId
- Stake Contract
Mainnet:
https://etherscan.io/address/0xe8239B17034c372CDF8A5F8d3cCb7Cf1795c4572#writeProxyContract
Testnet:
https://goerli.etherscan.io/address/0x2176FF25DBcd2FA1E61184cdb1Be2644EA90862A#writeProxyContract - Fill up the parameters accordingly in function “4.exit” for Mainnet; “2.exit” for Testnet
| Parameter | Description | Example value |
| claimaddr (address) | Any address that you have access to receive the rewards | 0x333e6Ea9d938eC7a4ED0Cb7cc553f3c3fd386c93 |
| validatorId | The validator Id you want to un-stake | 1 |
- Bulk withdrawal
- To initiate the exit messages, the user must input claimaddr with the exact validatorIds
- Stake Contract
Mainnet:
https://etherscan.io/address/0xe8239B17034c372CDF8A5F8d3cCb7Cf1795c4572#writeProxyContract
Testnet:
https://goerli.etherscan.io/address/0x2176FF25DBcd2FA1E61184cdb1Be2644EA90862A#writeProxyContract
- Fill up the parameters accordingly in function “2.batchExit” for Mainnet; “1.batchExit” for Testnet
| Parameter | Description | Example value |
| claimaddr (address) | Any address that you have access to receive the rewards | 0x333e6Ea9d938eC7a4ED0Cb7cc553f3c3fd386c93 |
| validatorIds | The validator Id you want to un-stake | [1,2] |
More APIs for Staking Management
Conclusion
Integrating native ETH staking into your Web3 product with RockX’s comprehensive guide provides a streamlined, secure pathway to harnessing the full potential of ETH staking. This guide, enriched with practical steps, and environmental details, equips institutions with the necessary tools to customize and enhance their staking offerings. By following the outlined steps and leveraging RockX’s robust solutions, your institution can confidently navigate the complexities of ETH staking, ensuring a seamless experience for your clients and a solid foundation for your staking strategies.
For more information, you may contact our team directly, or read our case studies for a practical look at the application of the above information.


